
 EN
EN
 FR
FR DE
DE JA
JA KO
KO RU
RU ES
ES AR
AR IT
IT
Foreword
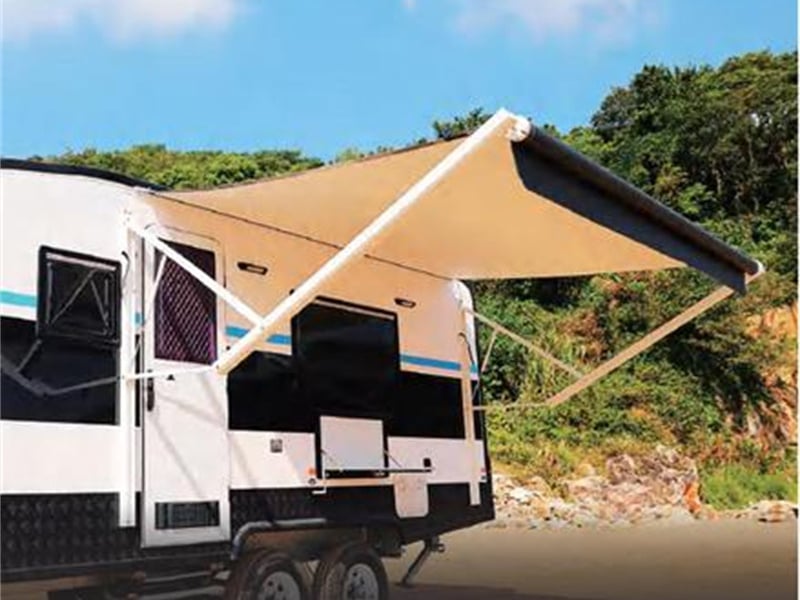
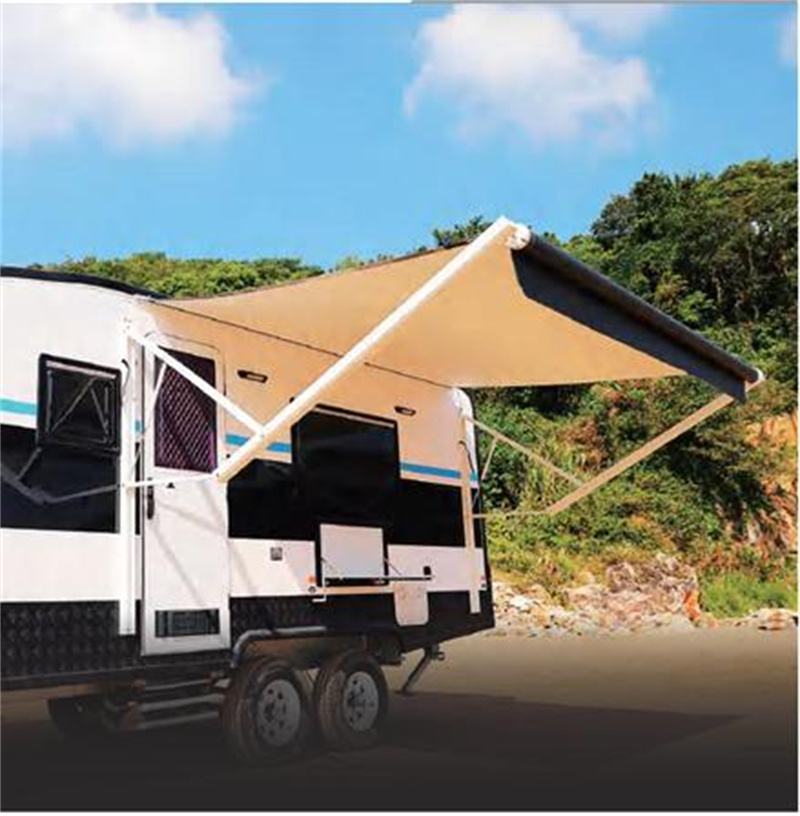
The motorized awning for RVs is a core accessory for expanding outdoor living space. However, mainstream installation tutorials from brands like Lippert and Dometic often simplify crucial steps such as structural adhesive waterproofing and motor limiters, easily leading to problems like leaks, awning misalignment, and motor overload damage. This article, based on the official Awnlux W5700/W5700C modular awning manual, provides a complete breakdown of the entire process, from unpacking and verification, positioning and drilling, frame assembly, fabric wiring, motor calibration to final fixing. It covers drawing annotations, tool requirements, and pitfall avoidance tips, making it suitable for towed and motorhome vehicles, and allowing for immediate hands-on practice.
I.Pre-installation preparations
1. Inventory of parts (compare with two sets of parts drawings)
After unpacking, check the parts against the two accessory lists to distinguish between the standard W5700 and the modular W5700C:
Parts image of the spliced model
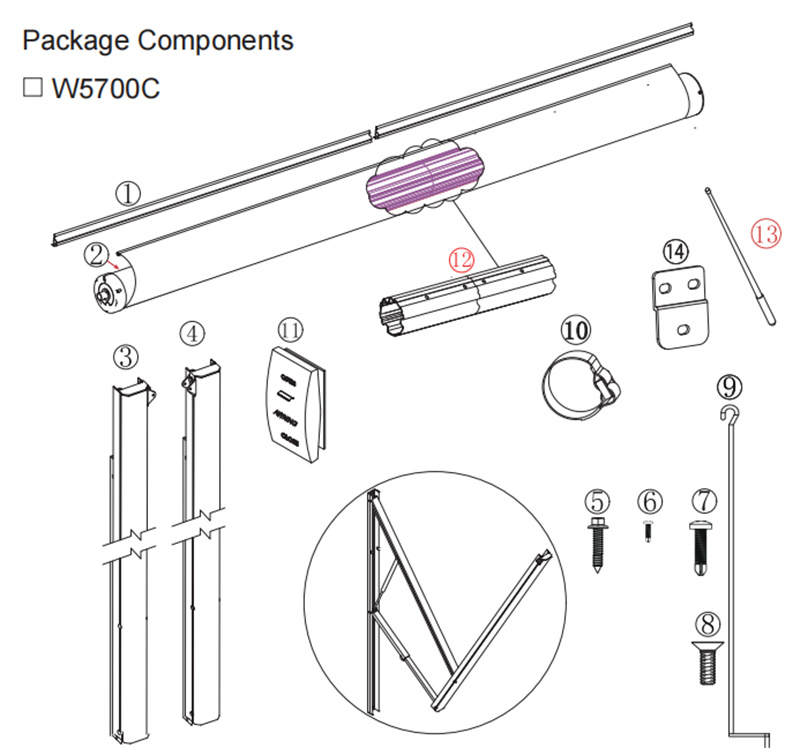
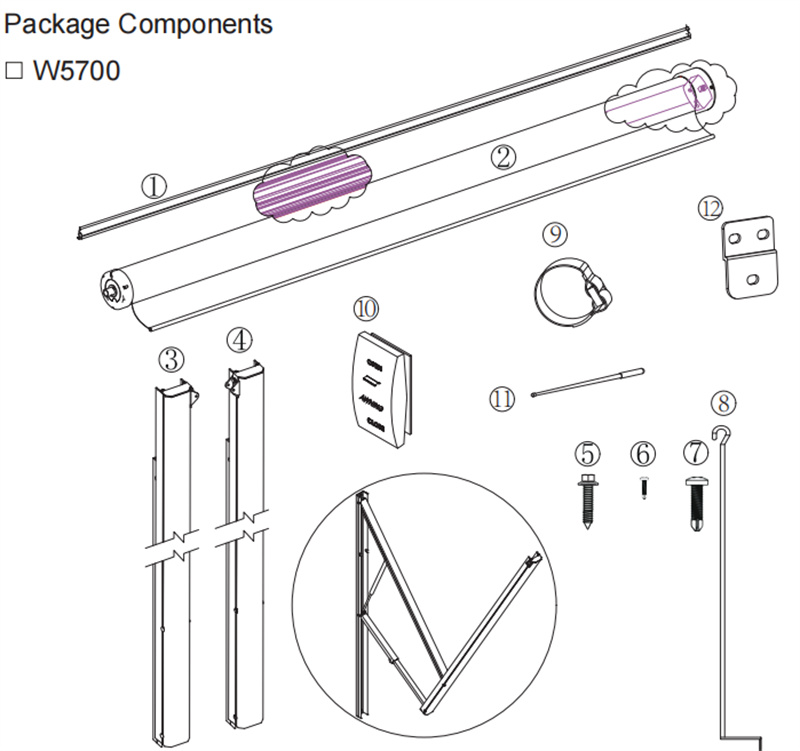
- Common core components: fabric locking aluminum strip ①, fabric roll tube ②, left/right arm ③④, Z-shaped mounting bracket ⑫/⑮, DC12V switch ⑩, adjusting rod ⑭, hand crank ⑧, Velcro ⑨;
- The splicing model features: splicing pipe ⑬ and M6×16 countersunk screws ⑨, for splicing tarpaulins with a width of 3.9m or more;
- Complete set of screws: M6×25 external hex screws⑤, Φ3.9×13 fixing screws⑥, Φ4.2×25/32 self-drilling screws⑦⑧.
2. Essential tools and materials
Electric drill, measuring tape, marker, spirit level, A-frame ladder, RV-specific structural sealant, gloves; power cord must be ≥1.5mm², length limited to 10 meters, and compatible with 12V vehicle power supply.
3. Vehicle body positioning marks (Pic.1 Dimension drawing)
All anchor points must be located on the load-bearing frame of the RV body; fixing to thin-walled decorative panels is prohibited.
Installation point dimensions diagram
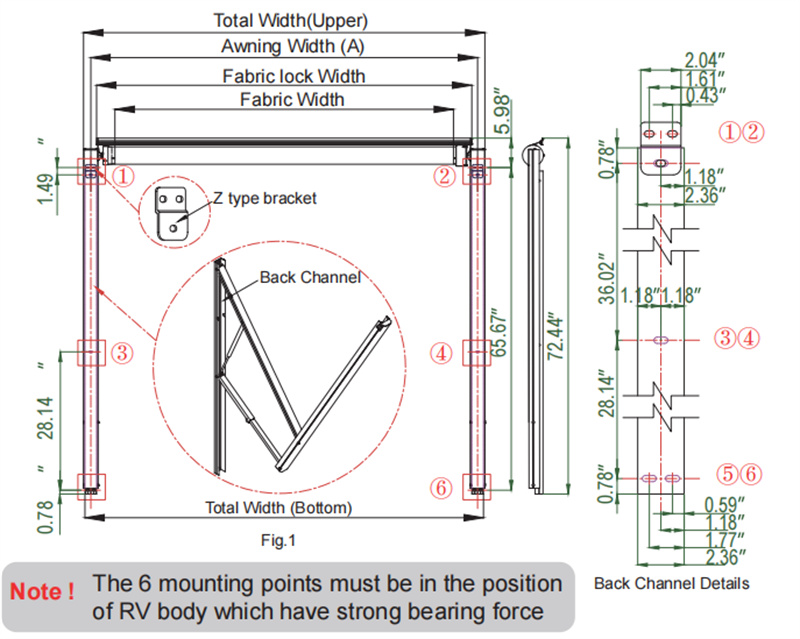
① Calculate the dimensions based on the tent width A (center distance between arms): total top width A + 0.075m, total bottom width A + 0.06m, fabric width A - 0.25m;
② There are a total of 6 sets of mounting holes: ①② upper mounting bracket , ③④ middle mounting bracket , ⑤⑥ lower mounting bracket , which are vertically aligned on the left and right and horizontally aligned on the same side;
③ The height is fixed at 1668mm, with a maximum extension of 2.5m. After marking, use a spirit level to re-measure to avoid tilting and causing water accumulation on the tarpaulin.
④ Key prerequisite reminders (different from Lippert's simplified electric RV awning installation)
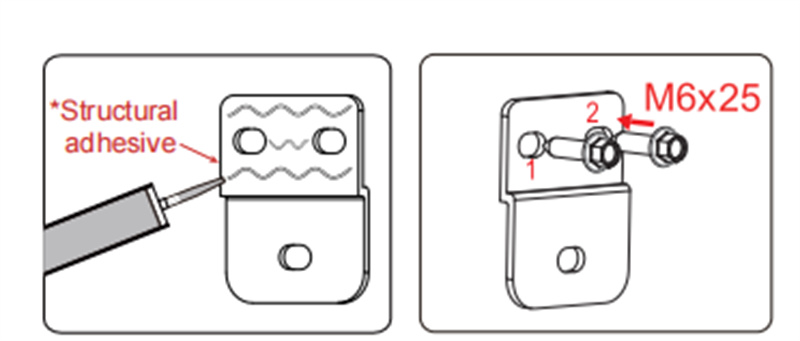
Before installing any mounting brackets or locking strips, structural adhesive must be applied evenly to the back. The adhesive must be fully cured for 24 hours before use. Thin-walled RVs are prone to mounting bracket detachment and water leakage if adhesive is not applied.
II.Step-by-step detailed installation practice
Step 1: Secure the Z-shaped mounting bracket to the arm frame
① Apply structural adhesive to the back of the Z-type mounting bracket, first fix the top holes 1 and 2, and then tighten with M6×25 screws;
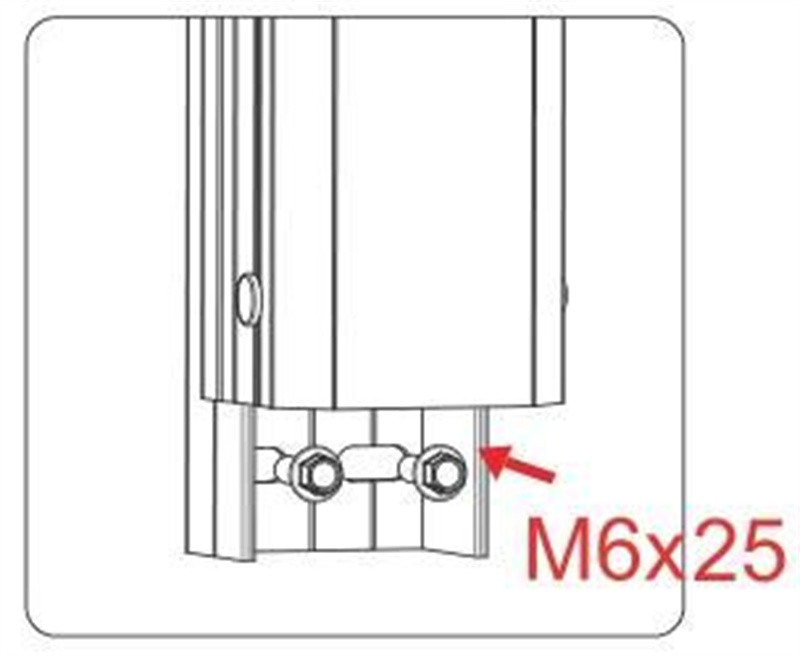
② Insert the folding arm rear bar into the Z-code slot, align it vertically, and then tighten the bottom M6×25 screw;
③ Safety requirements: The left and right folding arms must be securely fastened with Velcro throughout the installation process to prevent the installation clips from popping out and injuring the operator;
④ Pre-fix all mounting brackets, do not lock them all at once, leave room for fine-tuning to avoid the tarpaulin shifting later and being unable to be corrected.
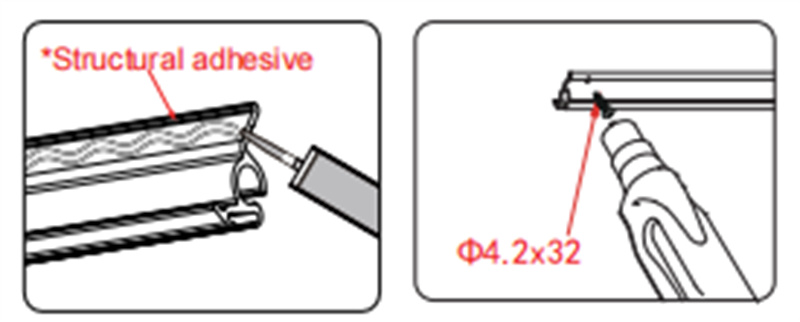
Step 2: Install the aluminum strip for the fabric lock + pre-treatment of the spliced roll tube.
① Apply structural adhesive to the back of the aluminum strip for waterproofing, attach it tightly to the vehicle body along the marked lines, and fix it in sections with Φ4.2×25 screws;
② W5700C splicing model exclusive operation:
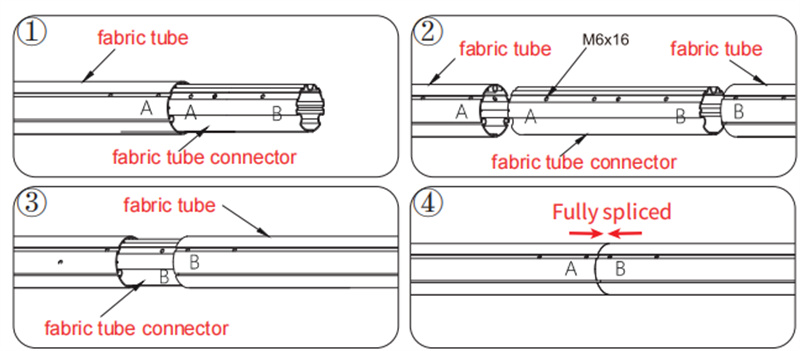
Remove the splicing pipe and insert the two sections of fabric roll pipe to connect them. Tighten the M6×16 countersunk screws on three sides, turning them in stages to prevent the aluminum pipe from deforming or tearing the tarpaulin.
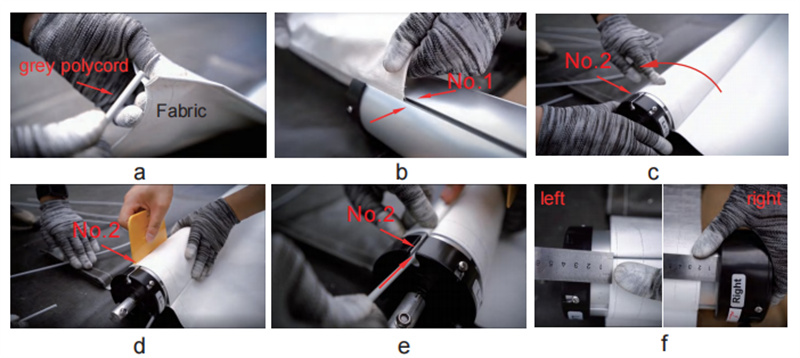
Attaching the tarpaulin tube: Embed the gray adhesive strip into the edge of the fabric, insert it into the No. 1 groove of the roll tube and tighten it, then press it into the No. 2 groove to fix it. Use a measuring tape to measure the distance between the left and right ends to ensure that the fabric is centered.
Step 3: Hanging fabric on the vehicle body through the groove
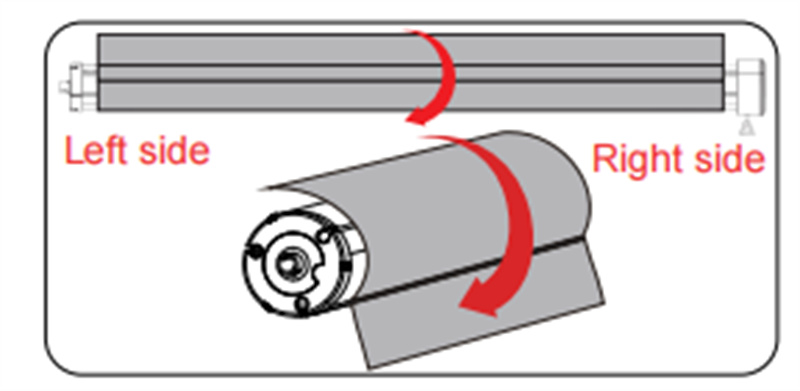
① Place the fabric roll tube on the roof of the vehicle, with the fabric extending outwards 20-30cm clockwise;
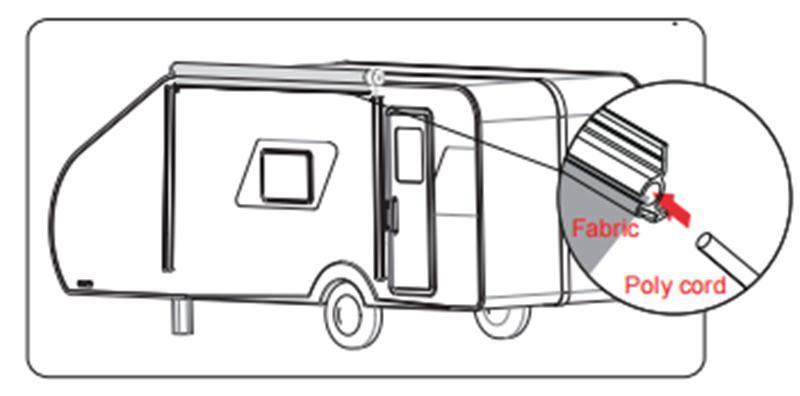
② The fabric strip is fully embedded into the aluminum strip of the body, and then a black sealing strip is inserted and pressed tightly to prevent rainwater from seeping into the body through the fabric gaps.
Step 4: Connect the fabric roll tube to the arm
- Key distinguishing points (Lippert common mistakes): The right end of the reel with the motor must be connected to the right arm , and the motor wiring harness should be routed inside the right arm to avoid exposed wiring harness wear.
Step 5: Motor limit adjustment
- Remove the Velcro straps from the arm and temporarily connect an external 12V power supply: connect the red wire of the switch to the positive terminal, the black wire to the negative terminal, the blue wire to the brown wire of the motor, and the white wire to the blue wire of the motor.
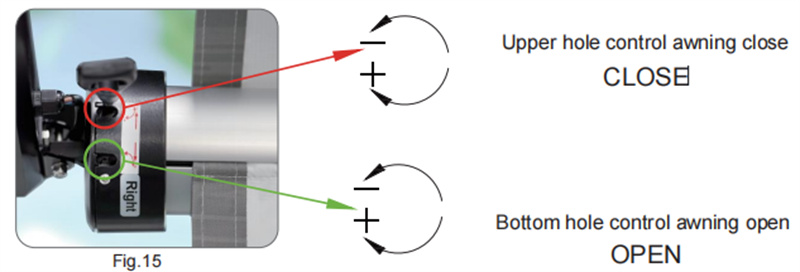
- Extension limit adjustment:
the awning is set to OPEN and cannot be fully opened, insert the adjusting rod into the lower hole of the motor and rotate it towards the "+" position.
Fully extend the motor while it continues to run, then make a slight adjustment to the "-" position 5-10 turns, leaving a 30cm allowance for retraction to prevent motor overload.
- Retract limit adjustment:
When switched to CLOSE for retraction, if it cannot be retracted, insert the adjusting rod into the upper hole and adjust towards "+"; when fully closed, the motor will keep running, and fine-tune towards "-" 5-10 turns;
- Debugging standard: The machine should automatically stop when it reaches its limit, without any jamming or abnormal noise from the motor running continuously.
Step 6-Step 7: Permanent Waterproof Wiring
① After the limit switch adjustment is completed, the temporary wire is removed, and the motor wiring harness is inserted into the arm tube through the reserved hole on the right arm.
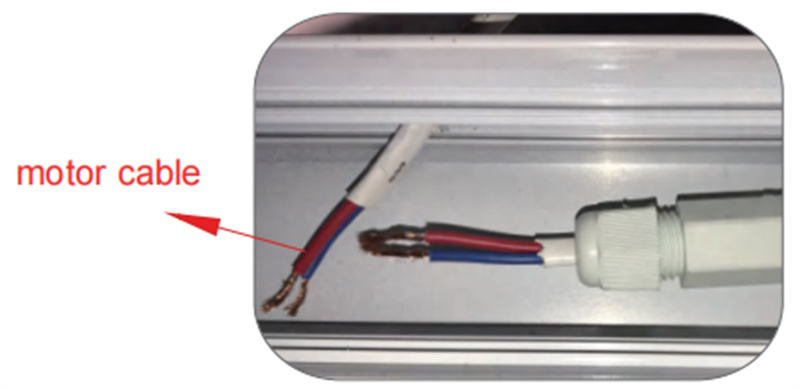
② The motor wires are connected to the vehicle's main wiring harness, and all connectors are sealed with waterproof connectors to prevent short circuits caused by rainwater.
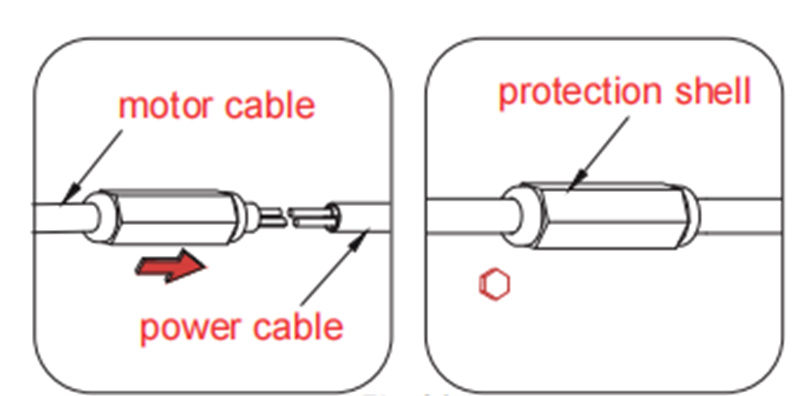
③ Mandatory standards for vehicle power supply specifications: stable voltage of 11-13V, wire thickness ≥1.5mm², and total wiring length not exceeding 10 meters.
Step 8: Tighten the installation clips completely.
After all the limiting and wiring are completed, tighten the third hole of the Z code and the middle adjustment hole of the arm, using M6×25 screws uniformly, with even force to avoid deformation of the aluminum profile due to compression.
Step 9: Permanently fix the tarpaulin
① Secure the fabric strip with Φ3.9×13 screws 10cm inward from both ends of the fabric to lock the fabric adhesive strip;
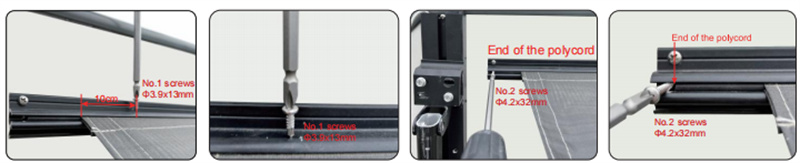
② Φ4.2×25 screws are driven into the ends of the adhesive strips at both ends of the fabric strip to prevent the adhesive strips from falling off;
③ W5700C spliced model: Two Φ4.2×22 screws are driven into the grooves at both ends of the fabric roll tube to fix the tarpaulin and prevent displacement.
Step 10: Install in-vehicle control switches
A hole is drilled in the interior wall of the vehicle according to the dimensions of the switch housing, and the switch is installed in an embedded manner.
Wiring logic:
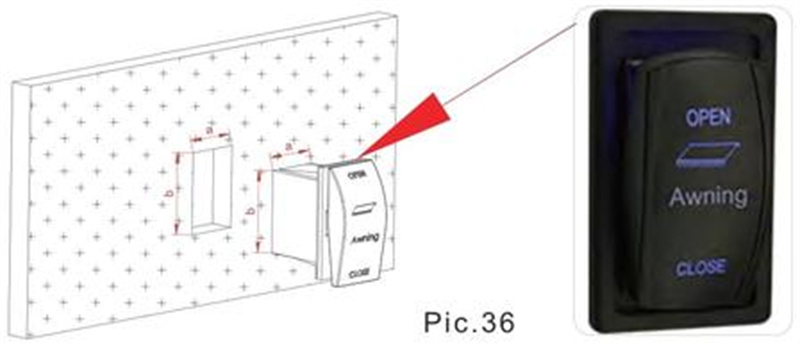
Model without LED lights: Red and black wires connect to the vehicle's power supply, and blue and white wires connect directly to the motor;
Optional LED light strip: Blue and white dual-line parallel motor and light strip, OPEN to unfold and light up, PAUSE to pause and light off, CLOSE to retract and light up.
III. Debugging, Use, and Troubleshooting
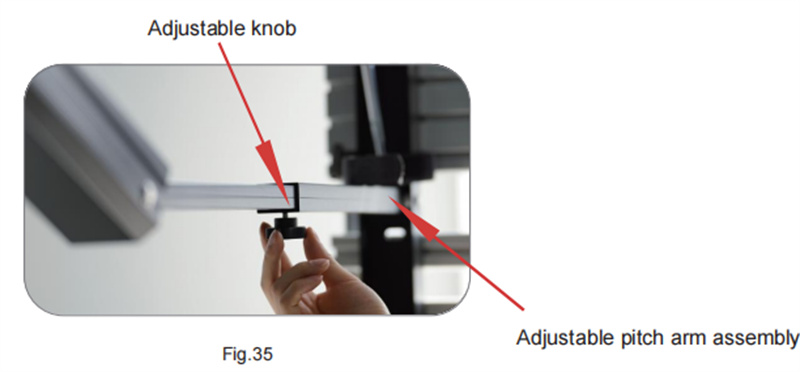
1. Adjustment of awning angle
After fully extending, release the arm adjustment knob and press down on one side of the arm to form a 15° inclined slope, allowing rainwater to flow out automatically; it must be fully retracted before heavy rain or blizzards to prevent water accumulation from collapsing the frame.
Actual shot of the angle adjustment knob
2. Emergency manual retraction
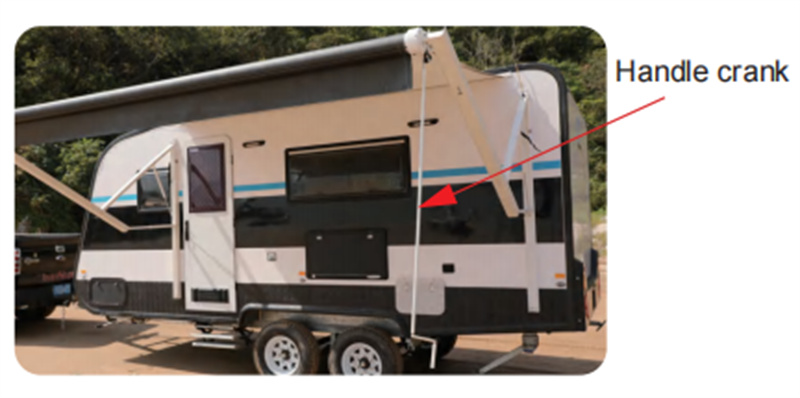
In the event of a power outage or motor failure, remove the hand crank, hook it onto the motor shaft, and manually rotate it to open or close. Before operating, clear any obstacles around the tarpaulin. Damage caused by forcibly pulling is not covered under warranty.
Emergency operation of hand crank
3. High-frequency fault solutions (superior to Lippert's simple troubleshooting)
① If the motor makes a clicking noise and does not run: First check the battery voltage and wire specifications. Wires shorter than 1.5mm² will cause voltage drop and overload. Test directly with the battery to distinguish between motor failure and line loss.
② Manually operable but electrically unresponsive: Check if the waterproof connector of the switch wiring inside the vehicle has been oxidized by water ingress;
③ If the tarpaulin is misaligned or wrinkled: recalibrate the roller to center it, adjust the number of limit turns at both ends, and tighten the fabric fixing screws.
IV. Long-term maintenance precautions
① Cleaning: Use only neutral detergent and a soft-bristled brush. Do not use strong acids or alkalis or hard-bristled brushes to avoid damaging the PVC waterproof fabric.
② Storage: After storing in a damp state, be sure to fully unfold and dry it on a sunny day before storing to prevent mold growth;
③ Avoid these pitfalls: Do not rub the tarpaulin against the corners of the doors, spray insecticides on the tarpaulin, or expose it to corrosive chemical environments for extended periods; for minor damage, apply PVC repair glue; for large tears, it is recommended to replace the tarpaulin with the original factory tarpaulin.
Summarize
Compared to Lippert's universal simplified installation solution, the Awnlux W5700's complete installation process emphasizes four core aspects: waterproof structural adhesive, precise motor positioning, deformation prevention of splicing pipes, and full waterproofing of the wiring harness . Each step is aligned with original factory drawings, avoiding common RV installation problems such as leaks, motor burnout, and tarpaulin tearing. The entire installation is recommended for 2-3 people and takes approximately 3 hours. Strict adherence to original factory dimensions, screw specifications, and curing time ensures the awning's stable use for many years.
Online Video Tutorial: Complete Awnlux RV Electric Awning Installation VideoURL: https://www.youtube.com/watch?v=yooeM4riuTo&t=24s
Original Printed Installation Manual W5700 ELECTRIC TRAILER AWNING Official Installation Instructions
Contact Awnlux for professional product recommendations and model selection
Email: [email protected]
Website: www.awnlux.com
Online Store: www.awnluxpro.com
YouTube Channel: https://www.youtube.com/@awnluxrvawning1619
Get in touch
Table of Contents
- Foreword
- I.Pre-installation preparations
-
II.Step-by-step detailed installation practice
- Step 1: Secure the Z-shaped mounting bracket to the arm frame
- Step 2: Install the aluminum strip for the fabric lock + pre-treatment of the spliced roll tube.
- Step 3: Hanging fabric on the vehicle body through the groove
- Step 4: Connect the fabric roll tube to the arm
- Step 5: Motor limit adjustment
- Step 6-Step 7: Permanent Waterproof Wiring
- Step 8: Tighten the installation clips completely.
- Step 9: Permanently fix the tarpaulin
- Step 10: Install in-vehicle control switches
- III. Debugging, Use, and Troubleshooting
- IV. Long-term maintenance precautions
- Summarize