 EN
EN
 AR
AR HR
HR CS
CS NL
NL FI
FI FR
FR DE
DE EL
EL HI
HI IT
IT JA
JA KO
KO NO
NO PL
PL PT
PT RO
RO RU
RU ES
ES SV
SV TL
TL ID
ID SR
SR SL
SL UK
UK VI
VI SQ
SQ HU
HU MT
MT TH
TH TR
TR MS
MS AZ
AZ KA
KA LO
LO MN
MN KK
KK KY
KY UZ
UZ
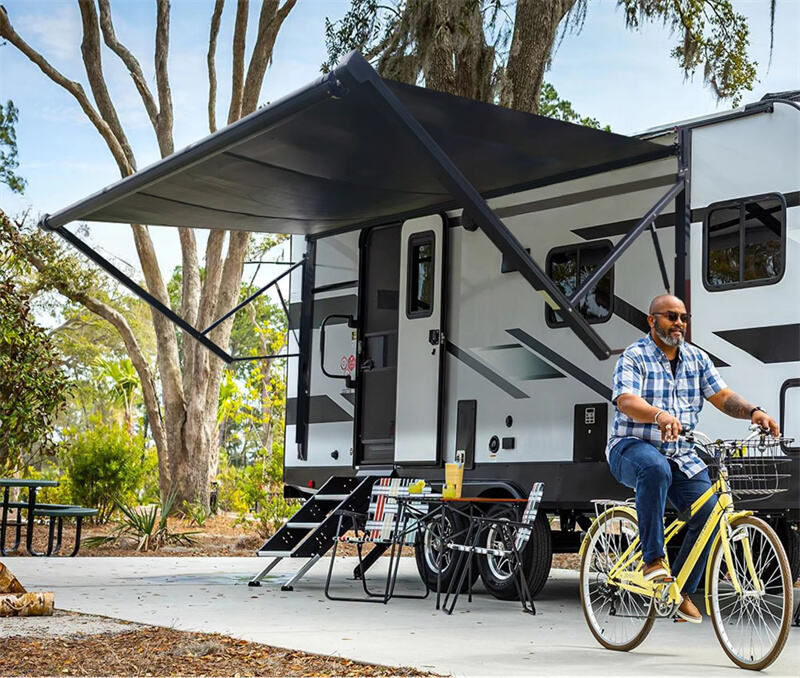
당신이 RV를 운전하여 즉흥적인 여행을 시작할 때, Awnlux 전기 카라반 롤아웃형 유연한 태양광 캐노피 는 여행 경험을 향상시키는 마법 같은 장치입니다. 무더운 날씨에 시원한 그늘을 제공할 뿐만 아니라 RV에 추가 전력도 공급합니다. 하지만 기능을 충분히 활용하려면 올바른 설치와 사용이 무엇보다 중요합니다. 다음에서는 이 캐노피의 설치 방법과 사용 시 주의사항을 자세히 소개하겠습니다.
I ,설치 준비 사항
설치 전에 Awnlux 전기 카라반 롤아웃형 유연한 태양광 캐노피 , 일련의 준비 작업을 해야 합니다.
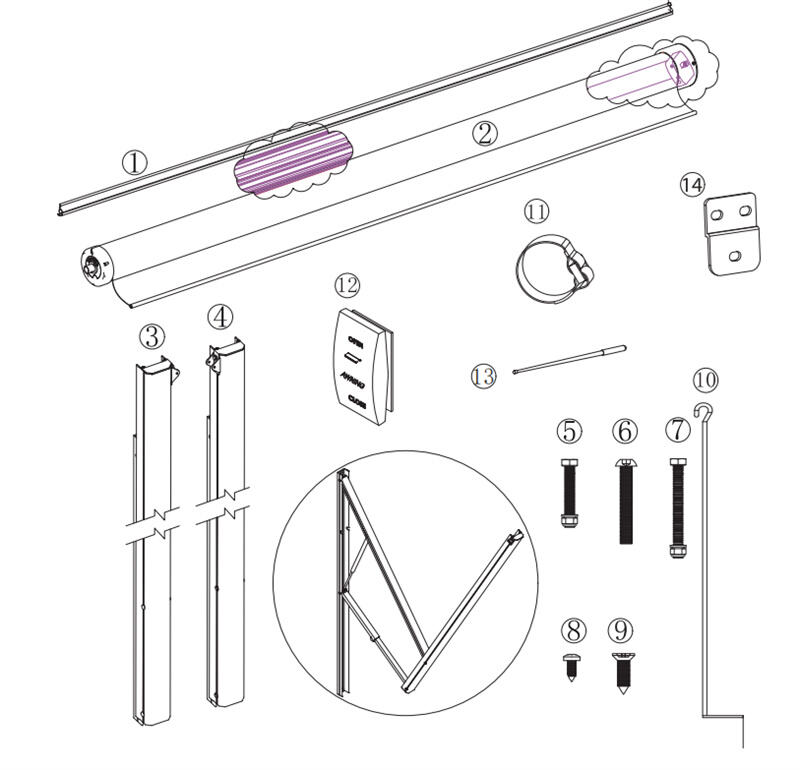
1. 제품 설명서에 따라 모든 부품을 점검하여 손상되거나 누락된 부분이 없는지 확인하세요. 완제품에는 Awnlux 전기 카라반 롤아웃형 유연한 태양광 캐노피 캐노피 통(태양광 패널 포함)①②, 카라반 용 파라솔 암③④, 캐노피 암 브래킷⑭, 나사⑤⑥⑦⑧⑨, 스위치⑫, 핸들 크랭크⑩, 조절 막대⑬가 포함됩니다.
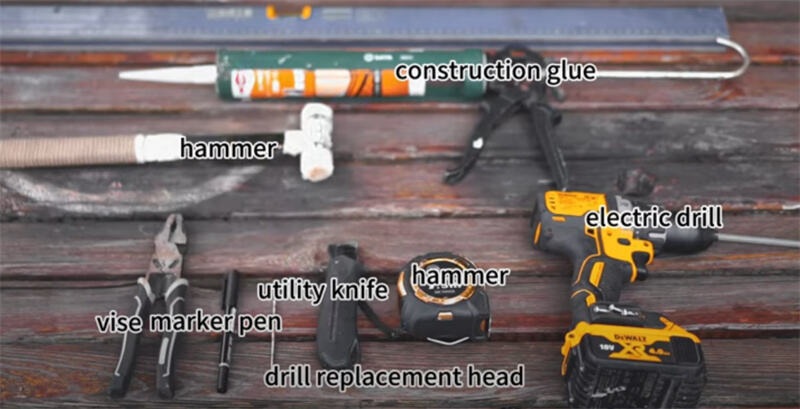
1. 2 설치에 필요한 도구를 준비하십시오. 전동 드릴, 렌치, 줄자, 수준기 등이 필요합니다.
1. 3 다음을 위한 Awnlux 전기 카라반 롤아웃 유연한 태양광 어닝 , 배선 경로는 미리 계획되어야 하며, 설치 작업은 비가 오지 않고 바람이 약한 날씨에 수행해야 합니다. 설치 중에는 반드시 전원을 차단하고 도구를 고정하여 떨어지는 것을 방지해야 합니다.
위의 준비를 완료한 후에는 구체적인 설치 단계로 진행할 수 있습니다. 다음 섹션에서는 다음의 설치 과정에 대해 설명하겠습니다. Awnlux 전기 카라반 롤아웃형 유연한 태양광 캐노피 세부적으로 설명해 드리겠습니다. 이를 통해 단계별로 설정을 완료할 수 있습니다!
Ii 상세 설치 단계
(I )고정식 카라반용 유연한 태양광 어닝 암
2. 1. 1적절한 설치 위치 선정도 매우 중요합니다. RV 측면의 평평하고 견고한 부위를 찾아 창문, 해치, 환풍구 또는 기타 장애물 근처에 설치하지 않도록 하십시오.
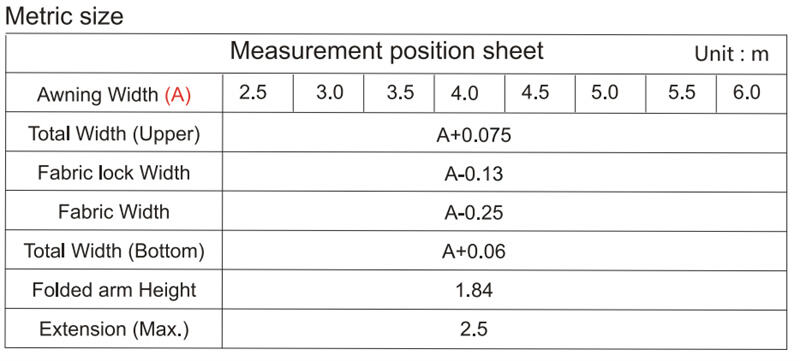
2. 1. 2귀하가 구입한 유연한 태양광 아워닝 크기에 따라, 6개의 설치 지점을 표시하십시오. 유연한 태양광 아워닝 다음 도면에 따라 팔을 설치하십시오. 참고: 정상적으로 작동하는지 확인하기 위해 레벨을 사용하여 마운트 포인트 ①과 ②, ③과 ④, ⑤와 ⑥이 반드시 동일한 수평선 상에 있도록 하십시오. 마운트 포인트 ①③⑤와 ②④⑥은 각각 동일한 수직선 상에 있어야 합니다. 유연한 태양광 아워닝 작동이 원활한지 확인하기 위해 레벨을 사용하여 설치 지점 ① 및 ②, ③ 및 ④, ⑤ 및 ⑥이 같은 수평선 상에 있도록 해주십시오. 설치 지점 ①③⑤와 ②④⑥은 각각 동일한 수직선 상에 위치해야 합니다.
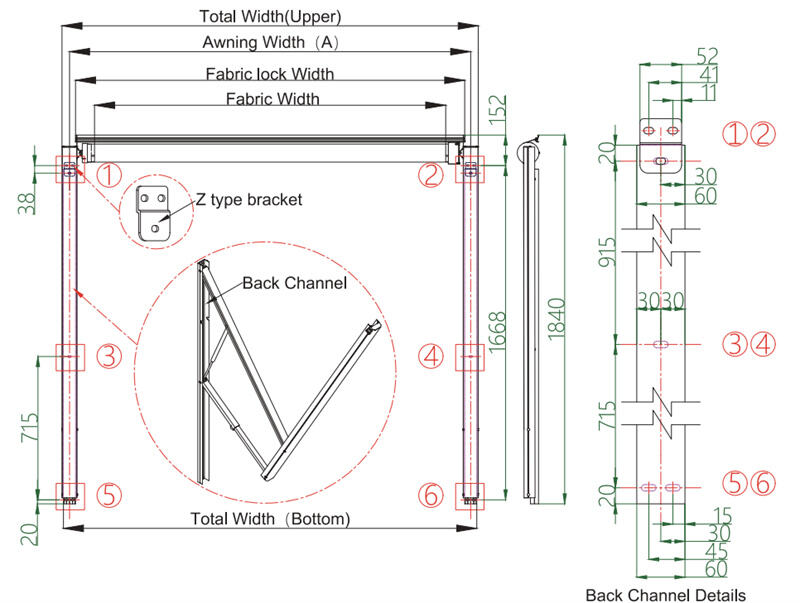
2. 1. 3 선택된 위치에 전기 드릴로 구멍을 뚫고 RV 측면에 Z자형 설치 브래킷을 고정시킨 후 유연한 태양광 아워닝 팔의 브래킷을 조이십시오. 선쉐이드 팔의 뒷 홈을 Z자형 브래킷에 끼워 넣고, 팔 하단의 나사를 고정시켜 모든 설치 지점이 단단히 고정되어 선쉐이드를 펼쳤을 때 무게와 바람에 견딜 수 있도록 해주십시오.
참고: Awnlux 전기식 카라반 접이식 유연 태양광 선쉐이드 팔은 공장 출하 전에 벨크로로 고정되어 있습니다. 이 과정에서 벨크로를 풀지 않도록 주의하여 다치는 일이 없도록 해주십시오.
(Ii )유연 태양광 선쉐이드 본체 설치
2. 2. 1 위의 도면에 따라 패브릭 잠금 레일의 설치 위치를 계산한 후 고정하십시오. 패브릭 잠금 레일 설치 후 각 설치 구멍에 구조용 본드를 발라 누수를 방지해야 합니다.
2. 2. 2 태양광 패브릭의 한쪽 끝을 유연한 태양광 아워닝 패브릭 잠금 레일에 폴리 코드를 통해 삽입하십시오.
2. 2. 3 유연한 태양광 아워닝 's 배럴을 암에 연결하고 나사로 고정하십시오.
2. 2. 4 태양광 패브릭이 앞뒤로 직사각형 형태가 되도록 하여 셀프 탭핑 나사를 사용해 패브릭 잠금 레일과 함께 고정하십시오.
모터 단부는 반드시 우측 암과 연결하십시오. 캐노피 본체가 암에 단단히 연결되어 헐거움이 없는지 확인하십시오.
(III) 유연한 태양광 캐노피 배선
임시 전원 또는 RV 배터리를 준비하여 전압이 최소 12볼트 이상인지 확인하십시오. 배선 전에 모터 전선은 캐노피 암 내부에 배선되어야 합니다.
2. 3. 1 모터에서 나오는 파랑 및 빨강 전선을 전원/배터리와 연결하십시오.
2. 3. 2 스위치의 빨간색 선을 전원장치의 (+)에 연결하고 스위치의 검은색 선을 전원장치의 (-)에 연결하십시오.
2. 3. 3 스위치의 파란색 선을 모터의 갈색 선에 연결하고 흰색 선을 모터의 파란색 선에 연결하십시오.
2. 3. 4 스위치를 눌러서 차양이 정상적으로 열리고 닫히는지 테스트하십시오. 완전히 열리지 않거나 수납이 되지 않는다면 설치 지침에 따라 모터 리미트를 조정하십시오. 정상적으로 개폐가 확인되면 전선을 차량에 연결하십시오.
구체적인 작업 방법은 다음 링크를 참조하십시오: https://www. youtube. com/watch? v=yooeM4riuTo
(IV )전선 태양광 패널
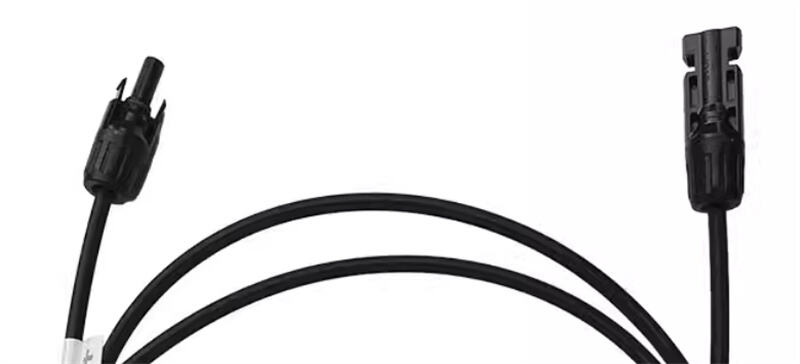
2. 4. 1 유연한 태양광 아워닝 인터페이스: Awnlux 전동식 유연한 태양광 차양 mC4 출력 인터페이스를 채택하며, 출력 포인트는 고객 요구에 따라 좌측 또는 우측에 설치할 수 있습니다. 일반적으로 출력 단에 양극과 음극이 표시되어 있습니다.
2. 4. 2 장치 호환성 확인 : 태양광 컨트롤러의 전압, 전류 등의 사양이 유연한 태양광 아워닝 , 배터리 및 기타 장비들이 서로 일치해야 합니다. 예를 들어, 컨트롤러는 배터리의 출력 전압에 적응할 수 있어야 하며, 유연한 태양광 아워닝 그리고 배터리의 정격 전압입니다.
권장 구성:
심층 방전 리튬 배터리 또는 AGM 배터리를 사용하는 것이 권장됩니다.
인버터의 전력은 총 부하에 따라 선택되어야 하며, 예를 들어 1000W, 2000W 등이 있습니다.
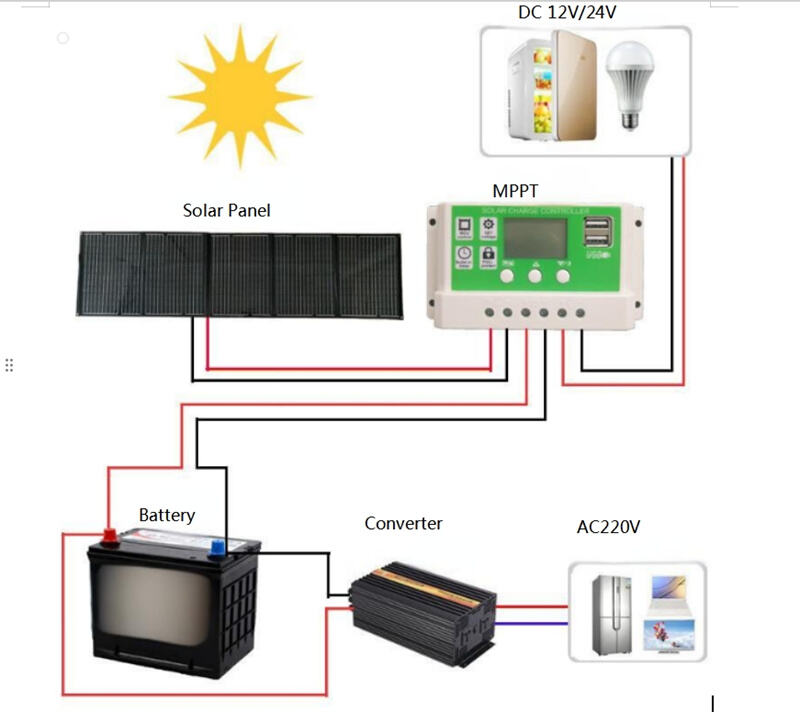
2. 4. 3 컨트롤러를 배터리에 연결하세요: 적절한 연결선을 사용하여 컨트롤러의 양극이 배터리의 양극에 연결되고, 컨트롤러의 음극이 배터리의 음극에 연결되도록 하세요. 컨트롤러의 출력단은 12V 또는 24V 배터리 시스템에 연결됩니다.
2. 4. 4 컨트롤러를 유연한 태양광 아워닝 : 의 출력선을 유연한 태양광 아워닝 mC4 인터페이스를 통해 해당 MC4 커넥터를 이용해 컨트롤러의 입력 인터페이스에 연결하세요. 양극과 음극이 올바르게 연결되었는지 확인하십시오.
2. 4. 5 배선 상태를 확인하십시오 : 배선 작업이 완료된 후 모든 연결 지점을 점검하여 배선이 단단히 고정되어 있고, 극성이 올바른지 확인하십시오. 회로 테스트를 위해 멀티미터를 사용하여 단락 및 개로를 제거할 수 있습니다.
배선 작업 중에는 감전 위험을 방지하기 위해 반드시 전원을 차단하십시오. 동시에 태양광 시스템의 전력과 거리에 따라 적절한 규격의 케이블을 선택하여 전력 전송 효율성과 안정성을 보장하십시오.
다른 장치에 전력을 공급해야 할 경우, 부하 장치를 태양광 컨트롤러의 출력부에 연결할 수 있습니다.
참고: 사용자가 220V 전력이 필요할 경우(예: 인덕션 쿡탑, 선풍기, 커피 머신 등), 인버터(DC-AC)를 추가로 연결하여 직류 전원을 교류 전원으로 변환할 수 있습니다.
(VI)D 디버깅
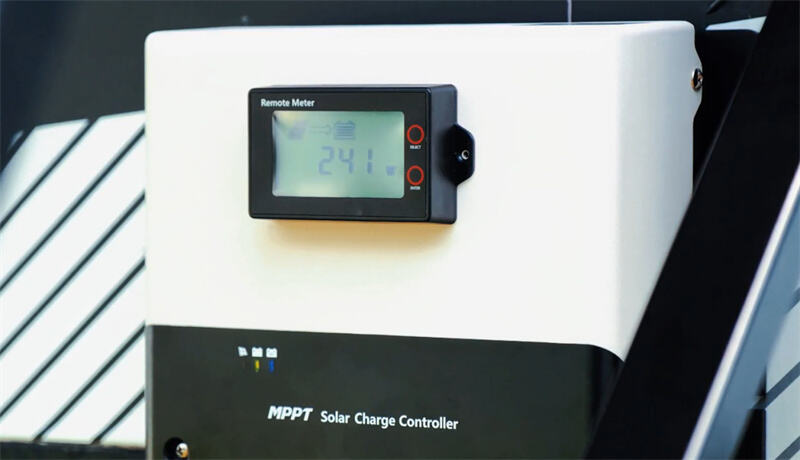
모든 설치 단계가 완료된 후 디버깅을 진행하십시오. 작동을 수행하여 유연한 태양광 아워닝 켜고 끄는 방식으로 태양광 발전 시스템이 원활하게 펼쳐지고 수납되는지 확인하세요. 동시에 시스템이 정상적으로 작동하는지 검사하십시오. 관련 장비를 사용하여 태양광 패널의 발전 및 충전 상태를 점검할 수 있습니다. 이상이 발견되면 설치 부품과 배선을 즉시 조정하십시오.
III ,사용 시 주의사항
(I) 날씨: 강풍, 폭우, 번개와 같은 악천후 시에는 유연한 태양광 아워닝 즉시 닫아 손상을 방지하십시오.
(II) 유지보수: 부드러운 천으로 표면 오염물을 정기적으로 청소하십시오. 매달 설치 지점과 나사를 점검하고, 느슨하거나 녹슬었을 경우 즉시 조정하십시오. 날카로운 도구나 부식성 세척제는 사용하지 마십시오.
(III) 하중: 무거운 물건을 걸거나 위에 올라타거나 뛰어내리는 것을 금지하여 유연한 태양광 아워닝 변형, 손상 또는 안전 사고를 방지하십시오.
(IV) 보관: 장기간 사용하지 않을 때는 완전히 건조한 후 유연한 태양광 아워닝 펼친 상태에서 건조하고 통풍이 잘되는 곳에 보관하십시오.
사용하는 방법에 대한 더 많은 팁을 알고 싶으시면 유연한 태양광 아워닝 , 또는 기타 문의사항이 있으신 경우 언제든지 문의해 주세요.