
 EN
EN
 FR
FR DE
DE JA
JA KO
KO RU
RU ES
ES AR
AR IT
IT
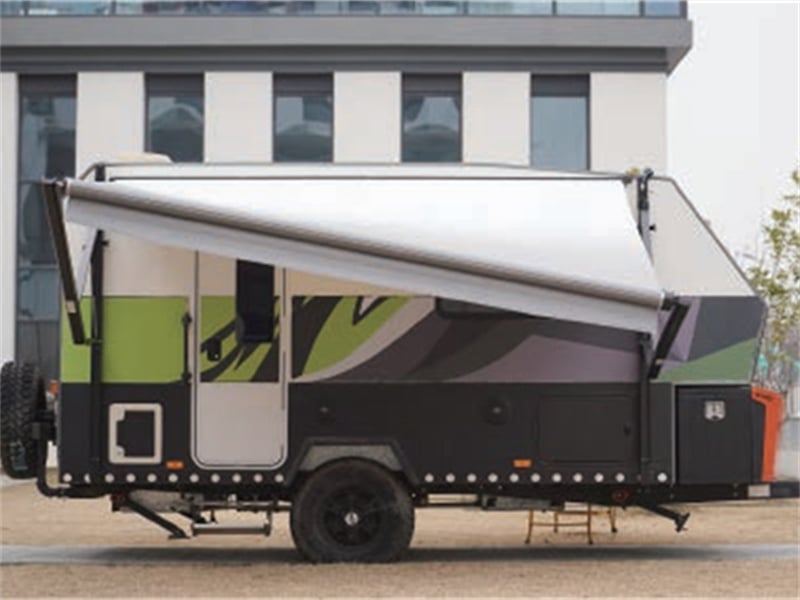
Introduction: Build a Comfortable Outdoor Camping Space for Your RV
Installing or replacing a wall-mounted electric awning on your RV is an optimal solution to elevate your camping experience. Standardized and professional installation procedures not only ensure the awning stays stable and durable under windy and rainy conditions but also prevent water leakage on the RV body and extend the overall service life of the motor.
This guide takes two Awnlux models—the W5700 one-piece roller tube and the W5700C segmented spliced roller tube—as examples, delivering a complete, actionable installation and commissioning tutorial for wall-mounted RV awnings, covering all core operating procedures.
I. Pre-Installation Preparation & Precision Positioning Measurement
1. Tool & Parts Checklist
Before construction, prepare essential tools including an electric drill, high-precision tape measure, marker pen, and safety step ladder. Structural adhesive or butyl waterproof tape is required for waterproof sealing of the vehicle body and reinforcement of bracket load-bearing capacity.
Two product variants are available: the Awnlux W5700 one-piece roller tube and the Awnlux W5700C segmented spliced roller tube. Inspect all supplied components thoroughly before installation to confirm no missing or damaged parts.
2. Core Positioning Standards
Mandatory industry installation rule: All load-bearing fixing screws must be fastened onto internal reinforcing backing boards within the RV wall. Never fasten directly to thin, unsupported RV body panels, as this may cause detachment or deformation.
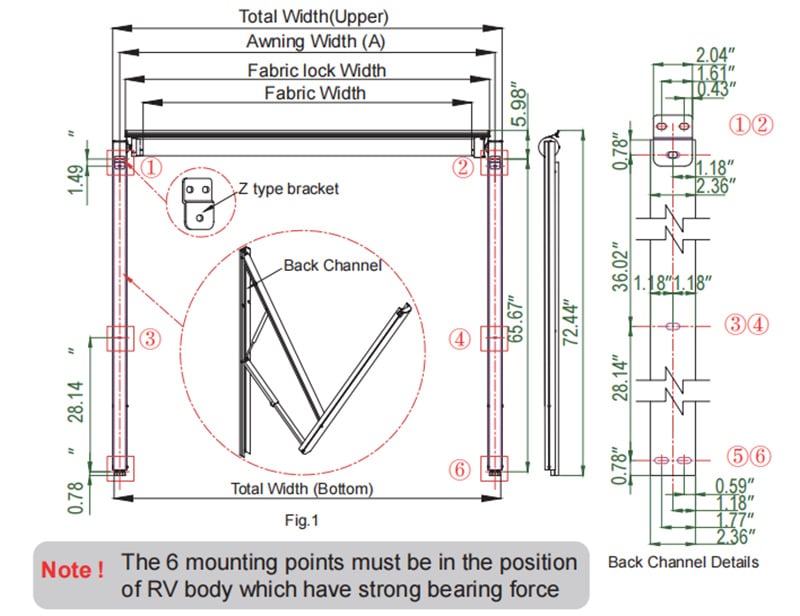
Adopt the 6-Point Alignment Positioning Method to mark mounting positions accurately:
- Divide mounting points into three groups: upper points 1 & 2, middle points 3 & 4, bottom points 5 & 6.
- Horizontal & vertical calibration: Each group of points must lie on the same horizontal line; the left vertical line (points 1 & 5) and right vertical line (points 2 & 6) must remain perfectly parallel.
- Standard dimension conversion: Let the total awning width = A.
Mounting width of the vehicle body fixing track = A - 0.13 m
Total mounting width of bottom support legs = A + 0.06 m.
Accurate dimensions guarantee seamless fitting when support arms are retracted.
II. Main Bracket Assembly & Wall Mounting
This stage requires 2–3 workers to operate collaboratively. Follow the assembly sequence strictly to ensure construction safety and structural stability.
1. Mount Z-Type Top Brackets
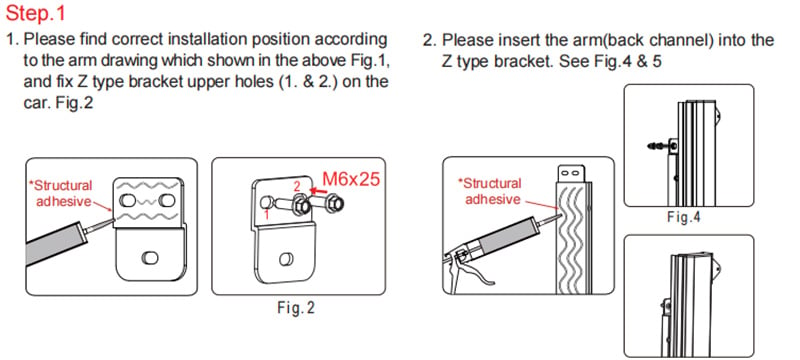
Apply an even, sufficient layer of structural adhesive to the rear side of each Z-type bracket, then fasten to upper mounting points 1 and 2 on the vehicle body using M6×25 self-tapping screws. Structural adhesive disperses load-bearing pressure on brackets, accommodates thin-shell RV bodies, and reduces the risk of vehicle panel deformation.
2. Mount Support Arms & Implement Safety Precautions
Slide the rear slide rails of the left and right support arms into the Z-type brackets, then secure the base screws of the support arm bottoms to the RV skirt main frame. Immediately bind both support arms with hook-and-loop straps after assembly.
Support arms are fitted with high-tension internal springs. Without roller damping restraints, the arms may snap open suddenly, posing severe impact and injury hazards. Strapping is a mandatory safety step.
3. Segmented Roller Splicing (Awnlux W5700C Model Only)
Use dedicated connecting sleeves to join segmented aluminum roller tubes. Tighten fasteners via alternating gradual torque to avoid aluminum tube deformation, which would lead to wrinkling or jamming of the awning fabric during retraction later.
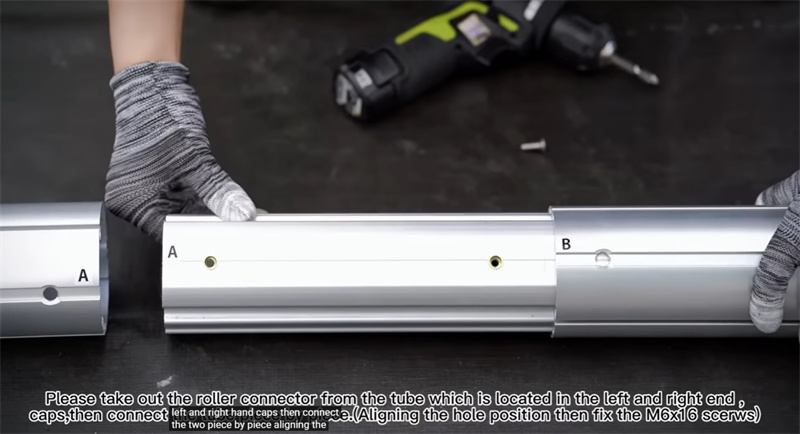
Operation Tip: Remove roller connectors from the left and right end caps of the tube. Align holes on the left and right caps and connectors, then fasten with M6×16 screws to join tube segments piece by piece.
4. Fabric Installation & Overall Lifting
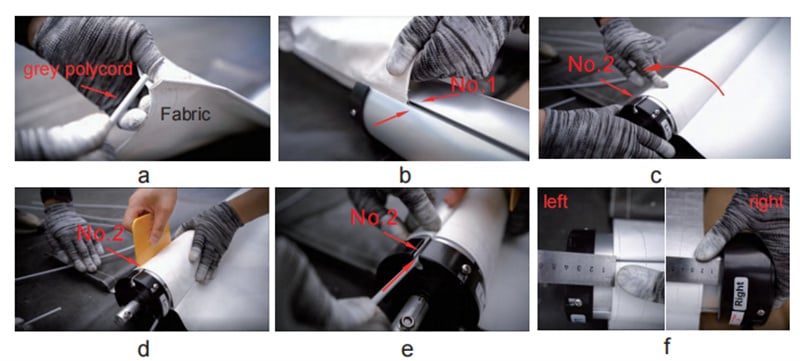
Fully insert the edge rubber strip of the awning fabric into the roller groove, ensuring the fabric is centered evenly on both roller ends and rolled flat onto the roller surface. Multiple workers lift the roller assembly together, slide the top rubber strip of the awning into the vehicle body fixing track, and slot the roller’s two end shafts into the top brackets of the support arms.
Important: Install the motor and wiring harness on the right support arm exclusively.
III. Electrical Wiring & Fine-Tuning of Motor Travel Limit Switches
Electric extension and retraction of the awning are driven by the motor electronic control system. Adhere strictly to standard parameters for wiring and limit adjustment.
1. Electrical Wiring Specifications
- Operating voltage range for stable motor performance: 11V–13V; maximum operating current: 7A
- Cable gauge standard: Use 16AWG wire for the main power cable between the power supply and control switch if cable length ≤ 10.9 meters. Upgrade to thicker 8AWG wire for longer runs to avoid insufficient power caused by line voltage drop.
- Waterproof protection: Enclose all wire joints inside dedicated protective housings to prevent short circuits and water ingress failures.
2. Fine Adjustment of Travel Limits
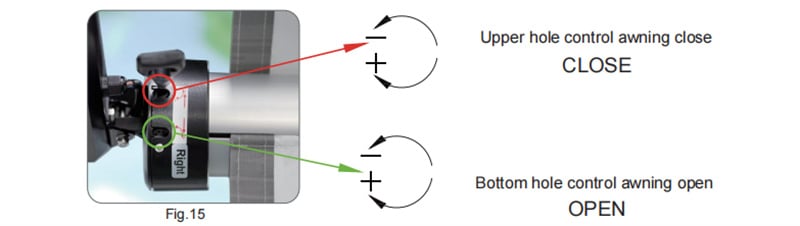
Two hexagonal adjustment holes are located on the right end cap of the motor:
- Upper hole: Controls retraction travel (CLOSE)
- Lower hole: Controls extension travel (OPEN)Turn toward the “+” mark to increase motor rotation cycles; turn toward the “-” mark to reduce rotation cycles.
(1) Extension Limit Calibration
Remove the hook-and-loop safety straps from the support arms and press the extend button.
If the awning stops before fabric is fully taut: Turn the lower adjustment hole toward “+” incrementally.
If the motor keeps running without stopping after full extension: Turn the lower adjustment hole toward “-” incrementally.Repeat testing until the motor automatically cuts power once fully extended with taut, wrinkle-free fabric.
(2) Retraction Limit Calibration
Press the retract button.
If the roller stops short of flush against the vehicle body: Turn the upper adjustment hole toward “+” incrementally.
If the motor remains overloaded and stalled after full retraction: Turn the upper adjustment hole toward “-” incrementally.Complete calibration when the motor auto-shuts off once the awning is fully retracted against the RV wall.
3. Anti-Shift Lock for Awning Fabric
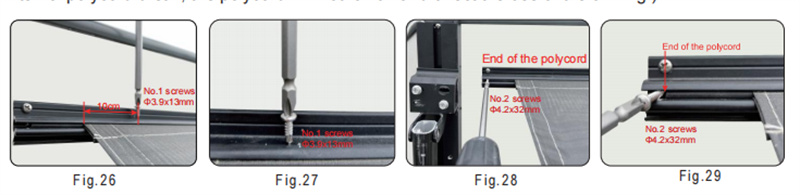
After limit adjustment, drive φ3.9×13 fixing screws approximately 10 cm from the edge of the vehicle body track. The screws penetrate the aluminum track and internal rubber strip to lock the awning fabric and prevent left-right shifting during operation.
IV. Standard Operating Procedures & Awning Fabric Maintenance Guidelines
Standardized use and regular maintenance greatly extend the overall service life of the awning.
1. Safe Operating Rules
- Severe weather control: Fully retract the awning during high winds, heavy rain, snowfall, or when leaving the campsite for extended periods.
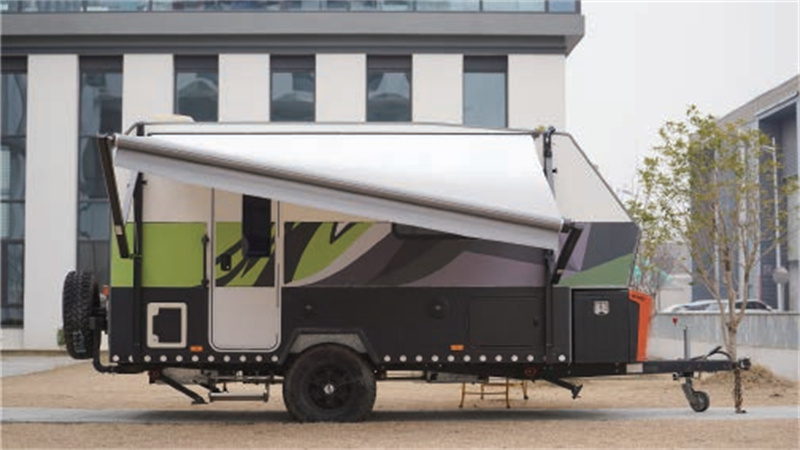
- Clearance requirement for extension: Ensure no obstacles such as trees or street lamps within 2.5 meters forward of the fully extended awning. Do not rigidly bind or lock the roller once fully deployed.
- Drainage slope adjustment: After full extension, loosen the adjustment knobs at the bottom of the support arms and lower one side to create a drainage slope with a bilateral height difference of no more than 15°, preventing standing water. Readjust both arms to level before retracting to avoid mechanical damage.
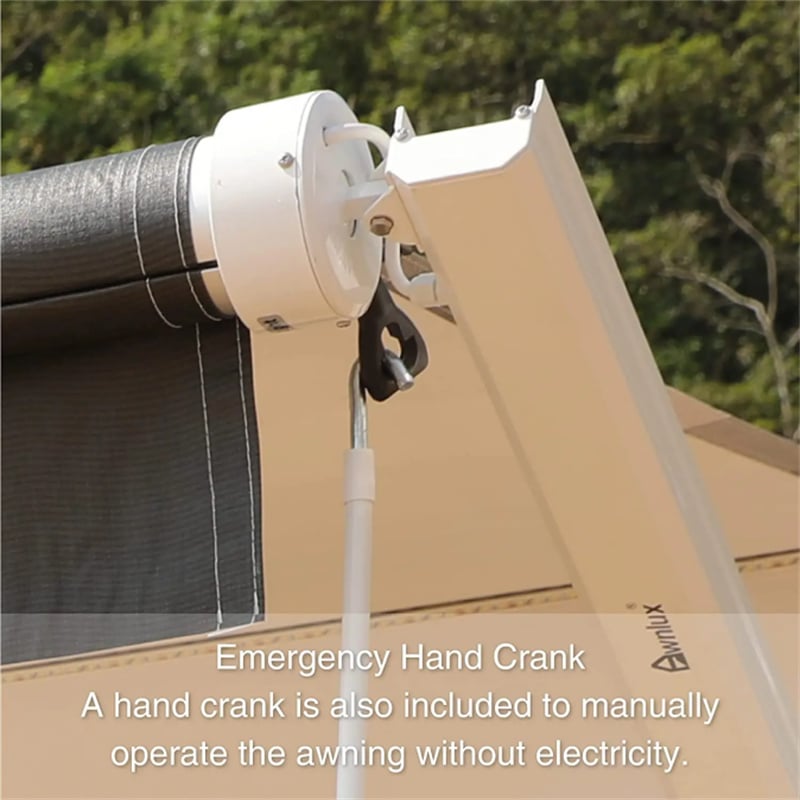
- Emergency hand-crank operation: When the vehicle loses power, attach the hand crank to the operating ring beneath the right motor to manually retract or extend the awning. Do not use the hand crank while power is active. Cease cranking immediately if resistance is felt; never apply brute force.
2. Fabric Maintenance Taboos & Cleaning Standards
Three Critical Maintenance Restrictions
- Do not spray insecticides or chemical sprays near the awning fabric—chemical agents will corrode the fabric’s waterproof coating.
- Never retract the awning for long periods while the fabric is damp; damp storage breeds mold, leading to permanent discoloration and mildew damage.
- If temporary wet retraction is unavoidable, fully deploy and air-dry the fabric at the earliest opportunity in sunny weather.
Deep Cleaning Process
Fully extend the awning and saturate the fabric with clean water. Spray diluted neutral detergent evenly across the fabric, then retract the awning and let it soak for 10 minutes.
Re-extend the awning, gently scrub stains with a soft brush, and rinse both sides thoroughly with pressurized clean water.
Remove all detergent residue completely—residual cleaner will accelerate fabric aging and brittleness when exposed to sunlight.
Conclusion: Standardized Operation for Enjoyable Camping
This guide covers the full workflow of wall-mounted RV awning installation, commissioning, and maintenance. Precise positioning, safe assembly, and refined motor calibration directly determine structural stability and operational safety of the awning.
Key practices to maximize service life: adjust drainage slopes appropriately during use, retract promptly in harsh weather, and follow all fabric maintenance rules. Adhering to three core principles—standardized installation, scientific commissioning, and regular maintenance—Awnlux electric awnings will deliver reliable long-term sun and rain protection for every comfortable camping journey.
Official Supporting Reference Materials
- Online Video Tutorial: Complete Awnlux RV Electric Awning Installation VideoURL: https://www.youtube.com/watch?v=yooeM4riuTo&t=24s
- Original Printed Installation Manual W5700 ELECTRIC TRAILER AWNING Official Installation Instructions
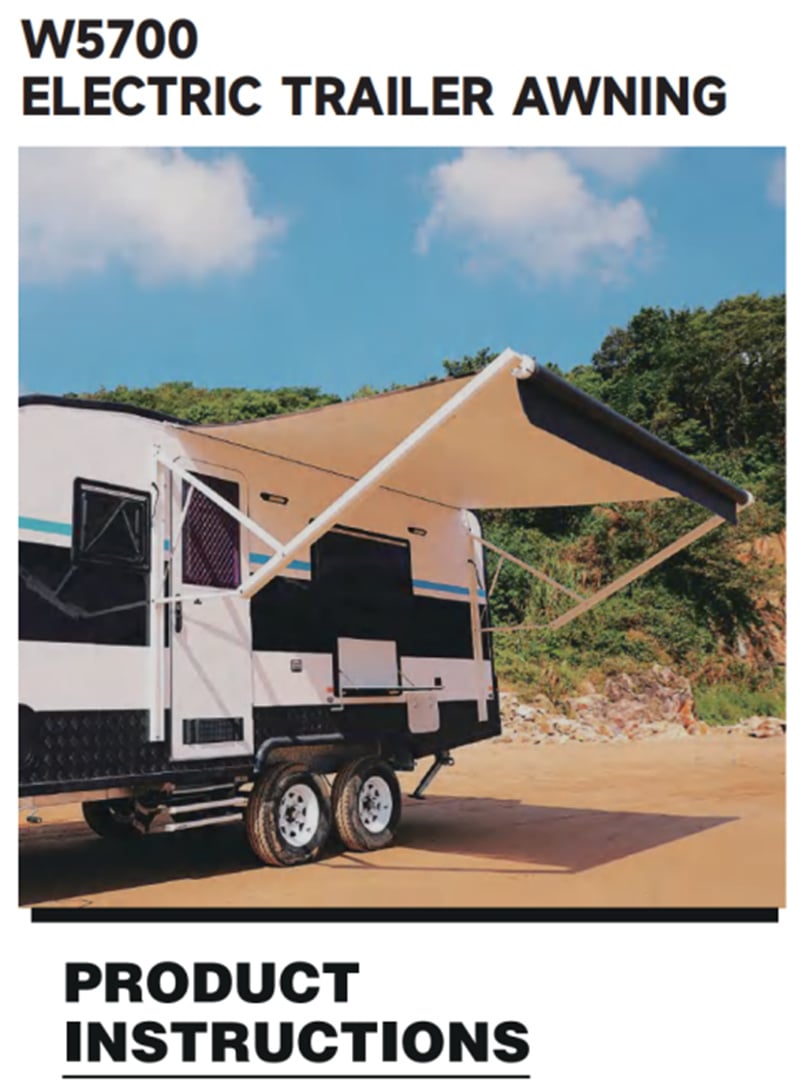
A printed copy of this manual is included in all W5700 series product packages. All installation and commissioning steps in this document are elaborated based on the original factory manual, which can be referenced on-site during construction.
Contact Awnlux for professional product recommendations and model selection
Email: [email protected]: www.awnlux.comOnline Store: www.awnluxpro.comYouTube Channel: https://www.youtube.com/@awnluxrvawning1619
Get in touch
Table of Contents
- Introduction: Build a Comfortable Outdoor Camping Space for Your RV
- I. Pre-Installation Preparation & Precision Positioning Measurement
- II. Main Bracket Assembly & Wall Mounting
- III. Electrical Wiring & Fine-Tuning of Motor Travel Limit Switches
- IV. Standard Operating Procedures & Awning Fabric Maintenance Guidelines
- Conclusion: Standardized Operation for Enjoyable Camping
- Official Supporting Reference Materials